
Create a Shared Storage Between Dualboot Linux and Windows

Dual-boot or multi-boot is not just a solution for us who just moved from Windows to Linux. However, sometimes we who are already using Linux for daily usage also need a Windows OS installed on bare-metal hardware (not virtualization). Usually to run certain tools or software in order to get the best support and performance, or just for backup purposes. So, dual-boot is not bad idea. And here, I will share my case regarding dual boot.
Objective:
I am using Ubuntu 20.04 as my primary operating system and Windows 10 as my secondary operating system. I need a partition to be a storage that can be accessed from both operating systems (Linux and Windows). So, I don't need to use external storage to share files between the two operating systems. I only need to store it in internal storage and I am free to access it from anywhere.
Note: you need to understand the basics about partition and file system.
This is my disk partition table.
/dev/sdaX: Ubuntu Parititon
/dev/sdb1: Shared Storage
/dev/sdb2: Windows Reserved
/dev/sdb3: Windows Partition [C:\]
Important!
If I write /dev/sdb1, it means I'm referring to the partition that will be shared storage, the name might be different from the one you have. Be carefull!
Let's get started!
1. Create a disk partition to be used.
I want to make the /dev/sdb1 partition to be shared storage between Linux and Windows. The file system that I recommend is NTFS. Because NTFS is supported in both operating system and is able to store large files.
To create the partition you are free to use any operating system. On Windows, you can use the Windows default tools disk management or any third party software partition tools. On Linux, you can also use any tools that you are familiar with it, to create partitions. You also free to determine the size of the partition as needed. But what needs to be noted is that the file system must be NTFS or FAT32, but I will recommend NTFS.
If you don't familiar how to create partition on Linux or Windows, please reference to the following article (English):
- How to create a disk partitions in Linux CLI using parted or fdisk commands.
- How to create a disk partition in Lunux GUI using GParted.
- How to make a disk partition on Windows 10 using disk management.
Or this is article in Bahasa Indonesia:
2. Mount the partition on Linux OS
On Linux, we can use command sudo mount partition target (i.e sudo mount /dev/sdb1 /home/webiptek/sdb1). But if you use this way, it will reset when you reboot your device. So, we will use fstab.
First, you must find out the /dev/sdb1 partition UUID using this command
$ sudo blkid /dev/sdb1
/dev/sdb1: UUID="0B02A9EE38EE11F9" TYPE="ntfs" PTTYPE="dos" PARTUUID="9b87945b-55bd-43fc-905d-84bcf2399da7"
Based on the result above, my /dev/sdb1 UUID is 0B02A9EE38EE11F9.
Create a directory that will be the location to mount the partition. For example I will mount /dev/sdb1 to /home/webiptek/sdb1. So I create /home/webiptek/sdb1
$ mkdir /home/webiptek/sdb1Get the userid and groupid to determine who owns the mounted file. Run the following commands (change "webiptek" to your username and group).
$ id -u webiptek
1001
$ id -g webiptek
1003
Open file /etc/fstab as root or sudoer user then add the following code in the bottom row (make sure you change the partition name, the UUID, target directory, uid (userid) and gid (groupid) values.
UUID=0B02A9EE38EE11F9 /home/webiptek/sdb1 ntfs defaults,uid=1001,gid=1003 0 0
Fstab will mount the partition and change the permissions automatically every time you start the system (booting). Now you can see the shared storage has been mounted.
3. Mount the partition on Windows OS
On Windows 10, I will used disk management tools to mount the partition. To open disk management, you can open Power User (WinKey + X), then select Disk Management. Or open Windows Explorer (WinKey + E), right-click on "This PC", and then click "Manage", then you can go to disk management tab.
This is a disk management window. Make sure your shared storage partition appears here.
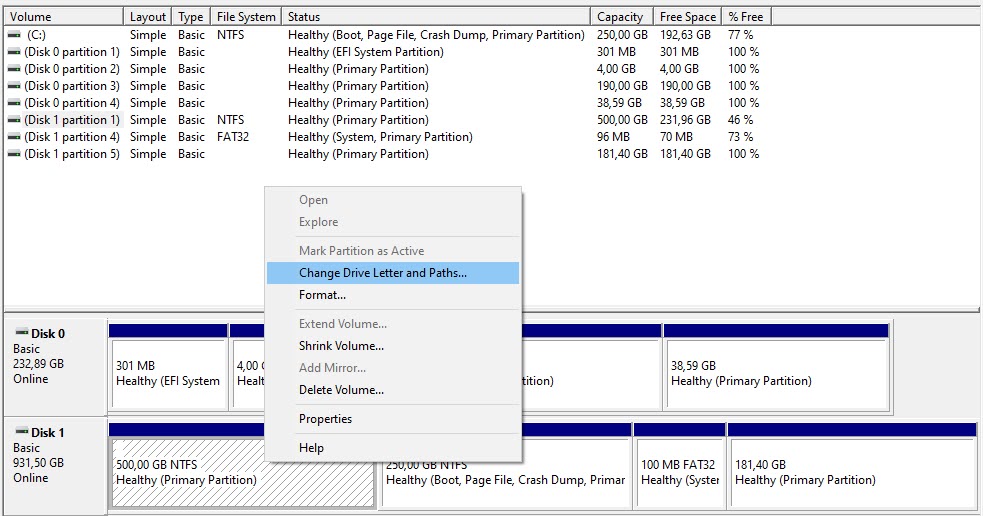
Right-click on that partition, and click "Change Drive Letter and Path..."
Click the "Add" button, and assign it with any letter that you want. Then, OK.
Now your shared storage is successfully mounted (on my case: it mounted to drive D:\).
4. Done, and these are some notes.
That's all. Now, you have a partition disk (I called it shared storage) that you can access and mount it on dual-boot system (Linux and Windows).
However, consider the following notes:
When you shutdown the Windows systems, make sure you do it right, don't force shutdown during the shutdown process. Or your file system will be read-only. If you have a read-only file system, the way to fix it is booting to your Windows then shutdown in properly.